Introduction
This post will present interesting approach to scalability and reliability:
How to implement multi-cloud application deployment ?!
There are many reasons why this is interesting topic. Avoiding provider lockdown, reducing cloud provider outage impact, increasing world-wide coverage, disaster recovery / preparedness are only some of them. The obvious benefits of multi-cloud deployment are increased reliability and outage impact minimization. However, there are drawbacks too: supporting different sets of code to accommodate similar, but different services, increased cost, increased infrastructure complexity, different tools … Yet, despite the drawbacks, the possible benefits far outweigh the negatives!
In the following article a simple service will be deployed in automated fashion over two different Cloud Service Providers: Amazon AWS and Joyent. Third provider, CloudFlare, will be used to service DNS requests. The choice of providers is not random. They are chosen because of particular similarities and because the ease of use. All of those providers have consistent, comprehensive APIs that allow automation through programming in parallel to the command line tools.
Preliminary information
The service setup, described here, although synthetic, is representative of multiple usage scenarios. More complex scenarios are also possible. Special care should be taken to address use of common resources or non-replicable resources/states. Understand the dependencies of your application architecture before using multi-cloud setup. Or contact Xi Group Ltd. to aid you in this process!
The following Cloud Service Providers will be used to deploy executable code on:
DNS requests will be served by CloudFlare. The test domain is: scalability.expert
Required tools are:
Additional information can be found in AWS CLI, Joyent CloudAPI Documentation and CloudFlare ClientAPI.
Implementation Details
A service, website for www.scalability.expert, has to be deployed over multiple clouds. For simplicity, it is assumed that this is a static web site, served by NginX. It will run on Ubuntu 14.04 LTS. Instance types chosen in both AWS and Joyent are pretty limited, but should provide enough computing power to run NginX and serve static content. CloudFlare must be configured with basic settings for the DNS zone it will serve (in this case, the free CloudFlare account is used).
Each computing instance, when bootstrapped or restarted, will start the NginX and register itself in CloudFlare. At that point it should be able to receive client traffic. Upon termination or shutdown, each instance should remove its own entries from CloudFlare thus preventing DNS zone pollution with dead entries. In a previous article, How to implement Service Discovery in the Cloud, it was discussed how DNS-SD can be implemented for similar setup with increased client complexity. In a multi-tier architecture this a proper solution. However, lack of control over the client browser may prove that a simplistic solution, like the one described here, is a better choice.
CloudFlare
CloudFlare setup uses the free account and one domain, scalability.expert, is configured:

Basic configuration includes only one entry for the zone name:
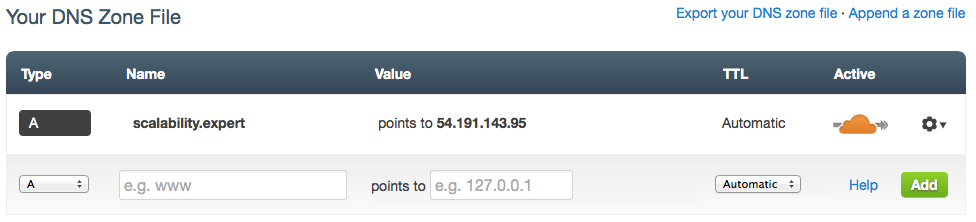
As seen by the orange cloud icon, the requests for this record will be routed through CloudFlare’s network for inspection and analysis!
AWS UserData / Joyent Script
To automate the process of configuring instances, the following UserData script will be used:
|
1 2 3 4 5 6 7 8 9 10 11 12 13 14 15 16 17 18 19 20 21 22 23 24 25 26 27 28 29 30 31 32 33 34 35 36 37 38 39 40 41 42 43 44 45 46 47 48 49 50 51 52 53 54 55 56 57 58 59 60 61 62 63 64 65 66 67 68 69 70 71 72 73 74 75 76 77 78 79 80 81 82 83 84 85 86 87 88 89 90 91 92 93 94 95 96 97 98 99 100 101 102 103 104 105 106 107 108 109 110 111 112 113 114 115 116 117 118 119 120 121 122 123 124 125 126 127 128 129 130 131 132 133 134 135 136 137 138 139 140 141 142 143 144 145 146 147 148 149 150 151 152 153 154 155 156 157 158 159 160 161 162 163 164 165 166 167 168 169 170 171 172 173 174 175 176 177 178 179 180 181 182 183 184 185 186 187 188 189 190 191 192 193 194 195 196 197 198 199 200 201 202 203 204 205 206 207 208 209 210 211 212 213 214 215 216 217 218 219 220 221 222 223 224 225 226 227 228 |
#!/bin/bash -ex # Debian apt-get install function apt_get_install() { DEBIAN_FRONTEND=noninteractive apt-get -y \ -o DPkg::Options::=--force-confdef \ -o DPkg::Options::=--force-confold \ install $@ } # Mark execution start echo "STARTING" > /root/user_data_run # Some initial setup export DEBIAN_FRONTEND=noninteractive apt-get update && apt-get upgrade -y # Mark progress ... echo "OS UPDATE FINISHED" >> /root/user_data_run # Install required packages apt_get_install jq nginx # Mark progress ... echo "SOFTWARE DEPENDENCIES INSTALLED" >> /root/user_data_run # Create test html page mkdir /var/www cat > /var/www/index.html << "EOF" <html> <head> <title>Demo Page</title> </head> <body> <center><h2>Demo Page</h2></center><br> <center>Status: running</center> </body> </html> EOF # Configure NginX cat > /etc/nginx/conf.d/demo.conf << "EOF" # Minimal NginX VirtualHost setup server { listen 8080; root /var/www; index index.html index.htm; location / { try_files $uri $uri/ =404; } } EOF # Restart NginX with the new settings /etc/init.d/nginx restart # Mark progress ... echo "NGINX CONFIGURED" >> /root/user_data_run # /etc/init.d startup script cat > /etc/init.d/cloudflare-submit.sh << "EOF" #! /bin/bash # # Author: Ivo Vachkov (ivachkov@xi-group.com) # ### BEGIN INIT INFO # Provides: DNS-SD Service Group Registration / De-Registration # Required-Start: # Should-Start: # Required-Stop: # Should-Stop: # Default-Start: 2 3 4 5 # Default-Stop: 0 1 6 # Short-Description: Start / Stop script for DNS-SD # Description: Use to JOIN/LEAVE DNS-SD Service Group ### END INIT INFO set -e umask 022 # DNS Configuration details ZONE="scalability.expert" HOST="www" TTL="120" IP="" # CloudFlare oSpecific Settings CF_HOST="https://www.cloudflare.com/api_json.html" CF_SERVICEMODE="0" # 0: Disable / 1: Enable CloudFlare acceleration network # Edit the following parameters with your specific settings CF_TOKEN="cloudflaretoken" CF_ACCOUNT="account@cloudflare.com" # Execution log file LOG_FILE=/var/log/cloudflare-submit.log source /lib/lsb/init-functions export PATH="${PATH:+$PATH:}/usr/sbin:/sbin:/usr/bin:/usr/local/bin:/usr/local/sbin" # Get public IP get_public_ip () { # Check what cloud provider this code is running on if [ ! -f "/var/lib/cloud/data/instance-id" ]; then echo "$0: /var/lib/cloud/data/instance-id is not available! Unsupported environment! Exiting ..." exit 1 fi # Get the instance public IP address I_ID=`cat /var/lib/cloud/data/instance-id` if [[ $I_ID == i-* ]]; then # Amazon AWS IP=`curl http://169.254.169.254/latest/meta-data/public-ipv4` else # Joyent IP=`ifconfig eth0 | grep "inet addr" | awk '{print $2}' | cut -c6-` fi } # Default Start function cloudflare_register () { # Get instance public IP address get_public_ip # Check the resutl if [ -z "$IP" ]; then echo "$0: Unable to obtain public IP Address! Exiting ..." exit 1 fi # Execute update towards CloudFlare API curl -s $CF_HOST \ -d "a=rec_new" \ -d "tkn=$CF_TOKEN" \ -d "email=$CF_ACCOUNT" \ -d "z=$ZONE" \ -d "type=A" \ -d "name=$HOST" \ -d "content=$IP" \ -d "ttl=$TTL" >> $LOG_FILE # Get record ID for this IP REC_ID=`curl -s $CF_HOST \ -d "a=rec_load_all" \ -d "tkn=$CF_TOKEN" \ -d "email=$CF_ACCOUNT" \ -d "z=$ZONE" | jq -a '.response.recs.objs[] | .content, .rec_id' | grep -A 1 $IP| tail -1 | awk -F"\"" '{print $2}'` # Update with desired service mode curl -s $CF_HOST \ -d "a=rec_edit" \ -d "tkn=$CF_TOKEN" \ -d "email=$CF_ACCOUNT" \ -d "z=$ZONE" \ -d "id=$REC_ID" \ -d "type=A" \ -d "name=$HOST" \ -d "content=$IP" \ -d "ttl=1" \ -d "service_mode=$CF_SERVICEMODE" >> $LOG_FILE } # Default Stop function cloudflare_deregister () { # Get instance public IP address get_public_ip # Check the resutl if [ -z "$IP" ]; then echo "$0: Unable to obtain public IP Address! Exiting ..." exit 1 fi # Get record ID for this IP REC_ID=`curl -s $CF_HOST \ -d "a=rec_load_all" \ -d "tkn=$CF_TOKEN" \ -d "email=$CF_ACCOUNT" \ -d "z=$ZONE" | jq -a '.response.recs.objs[] | .content, .rec_id' | grep -A 1 $IP| tail -1 | awk -F"\"" '{print $2}'` # Execute update towards CloudFlare API curl -s $CF_HOST \ -d "a=rec_delete" \ -d "tkn=$CF_TOKEN" \ -d "email=$CF_ACCOUNT" \ -d "z=$ZONE" \ -d "id=$REC_ID" >> $LOG_FILE } case "$1" in start) log_daemon_msg "Registering $HOST.$ZONE with CloudFlare ... " || true cloudflare_register ;; stop) log_daemon_msg "De-Registering $HOST.$ZONE with CloudFlare ... " || true cloudflare_deregister ;; restart) log_daemon_msg "Restarting ... " || true cloudflare_deregister cloudflare_register ;; *) log_action_msg "Usage: $0 {start|stop|restart}" || true exit 1 esac exit 0 EOF # Add it to the startup / shutdown process chmod +x /etc/init.d/cloudflare-submit.sh update-rc.d cloudflare-submit.sh defaults 99 # Mark progress ... echo "CLOUDFLARE SCRIPT INSTALLED" >> /root/user_data_run # Register with CloudFlare to start receiving requests /etc/init.d/cloudflare-submit.sh start # Mark execution end echo "DONE" > /root/user_data_run |
This UserData script contains three components:
-
Lines 0 – 62: Boilerplate, OS update, installation and configuration of NginX;
-
Lines 64 – 215: cloudflare-submit.sh, main script that will be called on startup and shutdown of the instance. cloudflare-submit.sh will register the instance’s public IP address with CloudFlare and set required protection. By default, protection and acceleration is off. Additional configuration is required to make this script work for your setup, account details must be configured in the specified variables!
-
Lines 217 – 228: Setting proper script permissions, configuring automatic start of cloudflare-submit.sh and executing it to register with CloudFlare.
Code is reasonably straight-forward. init.d startup script is divided to multiple functions and output is redirected to a log file for debugging purposes. External dependencies are kept to a minimum. Distinguishing between AWS EC2 and Joyent instances is done by analyzing the instance ID. In AWS, all EC2 instances have instance IDs starting with ‘i-‘, while Joyent uses (by the looks of it) some sort of UUID. This part of the logic is particularly important if the code should be extended to support other cloud providers!
Both AWS and Joyent offer Ubuntu 14.04 support, so the same code can be use to configure the instances in automated fashion. This is particularly handy when it comes to data driven instance management and the DRY principle. Command line tools for both cloud providers also offer similar syntax, which makes it easier to utilize this functionality.
Amazon AWS
Staring new instances within Amazon AWS is straight-forward, assuming awscli is properly configured:
|
1 2 3 4 5 6 7 |
aws ec2 run-instances \ --image-id ami-018c9568 \ --count 1 \ --instance-type t1.micro \ --key-name test-key \ --security-groups test-sg \ --user-data file://userdata-script.sh |
Joyent
Starting news instances within Joyent is somewhat more complex, but there is comprehensive documentation:
|
1 2 3 4 5 6 7 8 9 10 |
sdc-createmachine \ --account account_name \ --keyId aa:bb:cc:dd:ee:ff:gg:hh:ii:jj:kk:ll:mm:nn:oo:pp \ --name test \ --package "4dad8aa6-2c7c-e20a-be26-c7f4f1925a9a" \ --tag Name=test \ --url "https://us-east-1.api.joyentcloud.com" \ --metadata "Name=test" \ --image 286b0dc0-d09e-43f2-976a-bb1880ebdb6c \ --script userdata-script.sh |
This particular example will start new SmartMachine instance using the 4dad8aa6-2c7c-e20a-be26-c7f4f1925a9a package (g3-devtier-0.25-kvm, 3rd generation, virtual machine (KVM) with 256MB RAM) and 286b0dc0-d09e-43f2-976a-bb1880ebdb6c (ubuntu-certified-14.04) image. SSH key details are supplied through the specific combinations of Web-interface settings and SSH key signature. For the list of available packages (instance types) and images (software stacks) consult the API: ListPackages, ListImages.
NOTE: Joyent offers rich Metadata support, which can be quite flexible tool when managing large number of instances!
Successful service configuration
Successful service configuration will result in proper DNS entries to be added to the scalability.expert DNS zone in CloudFlare:
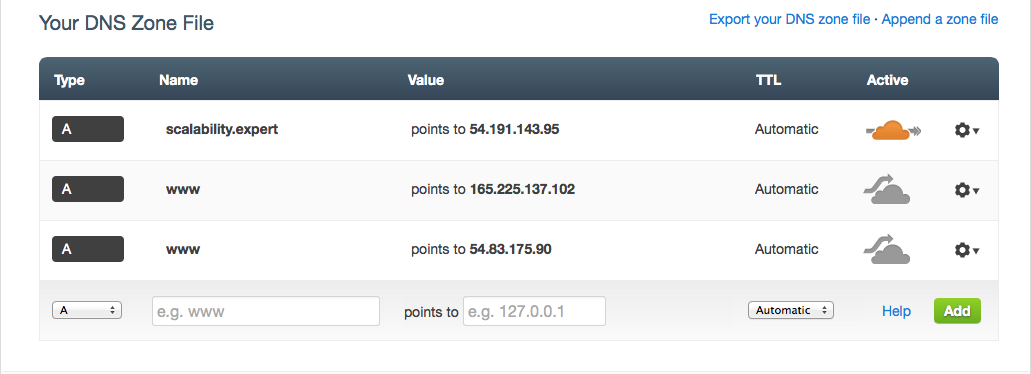
After configured TTL, those should be visible world-wide:
|
1 2 3 4 5 6 7 8 9 10 11 |
:~> nslookup www.scalability.expert Server: 8.8.4.4 Address: 8.8.4.4#53 Non-authoritative answer: Name: www.scalability.expert Address: 54.83.175.90 Name: www.scalability.expert Address: 165.225.137.102 :~> |
As seen, both AWS (54.83.175.90) and Joyent (165.225.137.102) IP addresses are returned, i.e. DNS Round-Robin. Service can simply be tested with:
|
1 2 3 4 5 6 7 8 9 10 11 12 |
:~> curl http://www.scalability.expert:8080/ <html> <head> <title>Demo Page</title> </head> <body> <center><h2>Demo Page</h2></center><br> <center>Status: running</center> </body> </html> :~> |
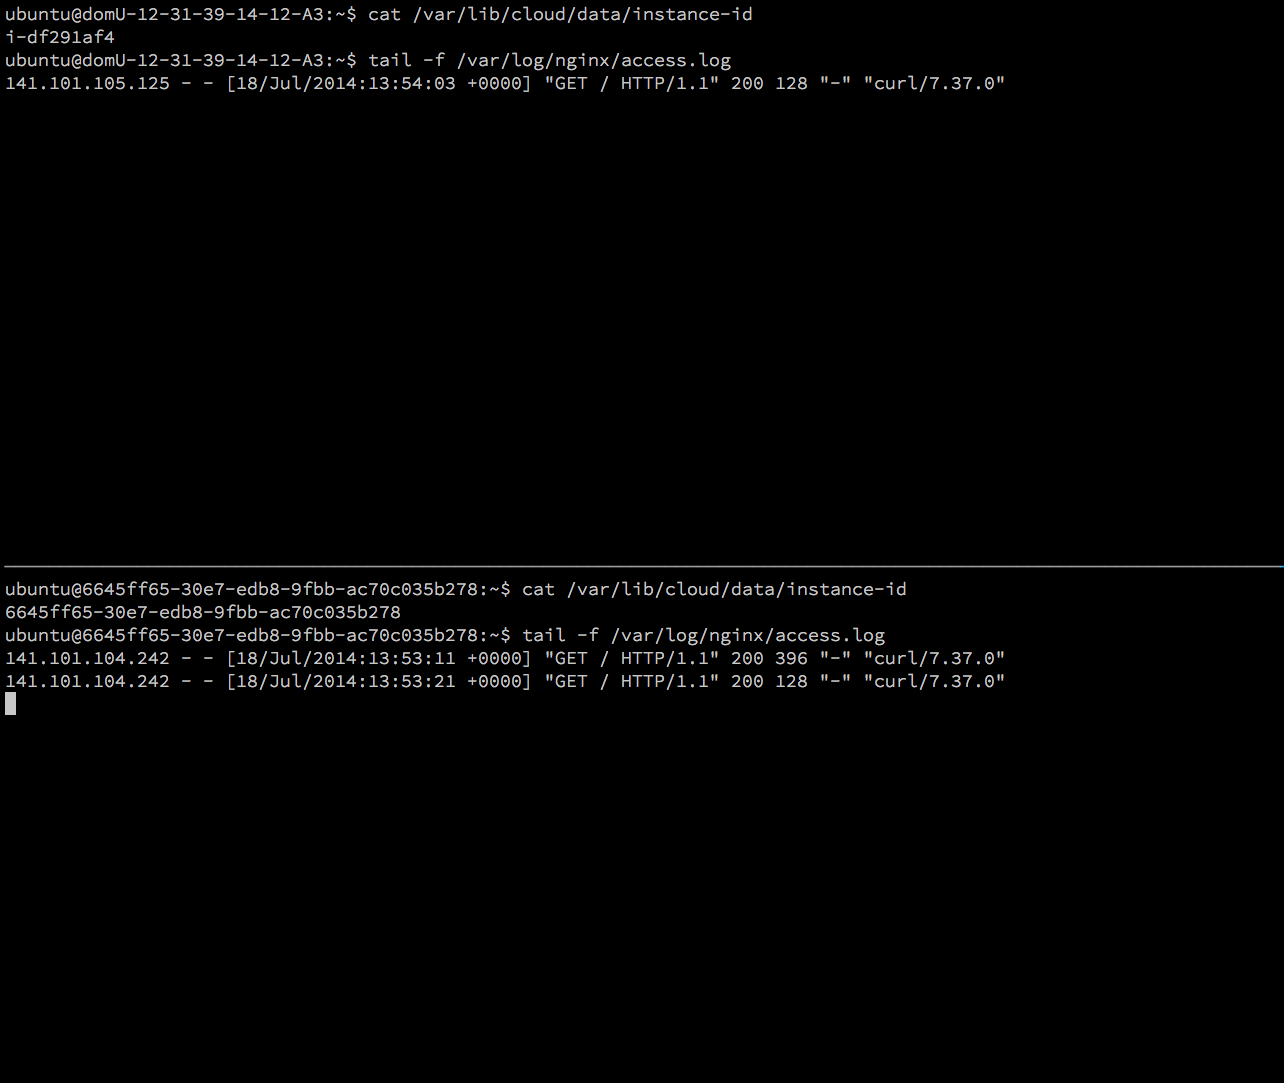
Resulting calls can be seen in the NginX log files on both instances:
NOTE: CloudFlare protection and acceleration features are explicitly disabled in this example! It is strongly suggested to enabled them for production purposes!
Conclusion
It should be clear now, that whenever software architecture follows certain design principles and application is properly decoupled in multiple tiers, the whole system can be deployed within multiple cloud providers. DevOps principles for automated deployment can be implemented in this environment as well. The overall system is with improved scalability, reliability and in case of data driven elastic deployments, even cost! Proper design is key, but the technology provided by companies like Amazon and Joyent make it easier to turn whiteboard drawings into actual systems with hundreds of nodes!
References


